The ocean calls, the waves are waiting, but does deciphering a surf report feel like reading a foreign language? You are not alone. Understanding swell size and its subtleties literally transforms your approach to surfing. Between the raw numbers on your favourite app and the reality in the water, there is a world of nuance that only experienced surfers truly master. Get ready to lift the veil on the essential data that separates a memorable session from a damp squib.
Why swell size matters for your session
Mastering the art of the surf report means developing true independence when facing the ocean. Far from being just random digits on a screen, this data is the key to safe, informed, and enjoyable surfing.
Understanding the ocean for better autonomy
A surfer’s independence starts with the ability to anticipate conditions. Knowing how to interpret swell size allows you to plan your sessions, adapt your quiver, and choose the right spot at the right time. This knowledge shifts your relationship with the ocean: you go from a passive participant subject to the weather’s whims to a strategic surfer, capable of capitalising on the slightest variations. Observing the data also helps develop your “watermanship” or ocean sense. By regularly correlating forecasts with your observations in the water, you gradually refine your reading of the conditions. This expertise becomes particularly valuable during surf trips or when scouting new spots.
Safety and fun: the winning equation
Surfing safety relies heavily on an accurate assessment of conditions. A misjudged swell can turn a fun session into a dangerous situation. Understanding the true power of the waves allows you to adapt your level of commitment and avoid the ocean’s traps. Conversely, a precise reading of the conditions maximises your enjoyment. You optimise your choice of breaks, select the right board, and make the most of every paddle out. This methodical approach saves you from frustrating sessions and multiplies those magical moments.
The essentials of the surf report: beyond simple height
Modern surf reports go far beyond simply displaying a wave height. They provide a comprehensive identity card of oceanic conditions, grouping together all the parameters that influence your session.
What is a surf report and why use it?
A surf report aggregates meteorological and oceanographic data to predict surf conditions at a given spot. These forecasts, usually set out over several days, analyse the probable evolution of swell, wind, and tides. Checking a surf report is essential for optimising your time in the water. Conditions are constantly evolving, and a planned session can change completely in a matter of hours. These tools allow you to adjust your plans in real-time and catch the best weather windows.
Key elements of a good surf report
Swell height
Swell height represents the vertical amplitude of ocean undulations. Generally expressed in metres or feet, it is the main indicator of potential wave power. However, be aware: this measurement is taken offshore, before the swell interacts with the seabed.
Swell period
The period corresponds to the time elapsed between two successive swell crests. The higher this value, the more energy the swell carries. A long period (over 12 seconds) generates powerful, organised waves (groundswell), while a short period produces more chaotic conditions (windswell).
Swell direction
The orientation of the swell determines which spots will receive the best waves. Each site has favoured exposures based on its geographical configuration. A North-West swell will light up certain breaks, while a South-West swell will favour others.
The wind
Local wind directly influences wave quality. An offshore wind (blowing from land to sea) grooms and hollows out the waves, creating ideal conditions. Conversely, an onshore wind (blowing from sea to land) crumbles the waves and makes surfing difficult and choppy.
The tide
Tidal coefficients change the water depth at spots, affecting the shape and power of the waves. Some breaks work better at high tide, others reveal their potential at low tide. This temporal variable adds a strategic dimension to planning your sessions.
Understanding swell size
What is swell and where does it come from?
Swell is born from the action of wind on the ocean surface. In storm zones, violent winds generate undulations that then propagate over thousands of kilometres. This energy travels across oceans in the form of swell trains, carrying the power of distant storms all the way to our coastlines. Swell formation depends on three main factors: wind intensity, duration, and the extent of the affected area (the fetch). The greater these parameters, the more powerful and organised the resulting swell will be. This energy is remarkably well-preserved during its ocean journey, explaining why Arctic storms can generate perfect waves in the tropics.
Significant height vs. maximum height: what’s the difference?
Surf reports generally distinguish between several height measurements, each revealing a different aspect of the conditions.
Decoding averages and peaks
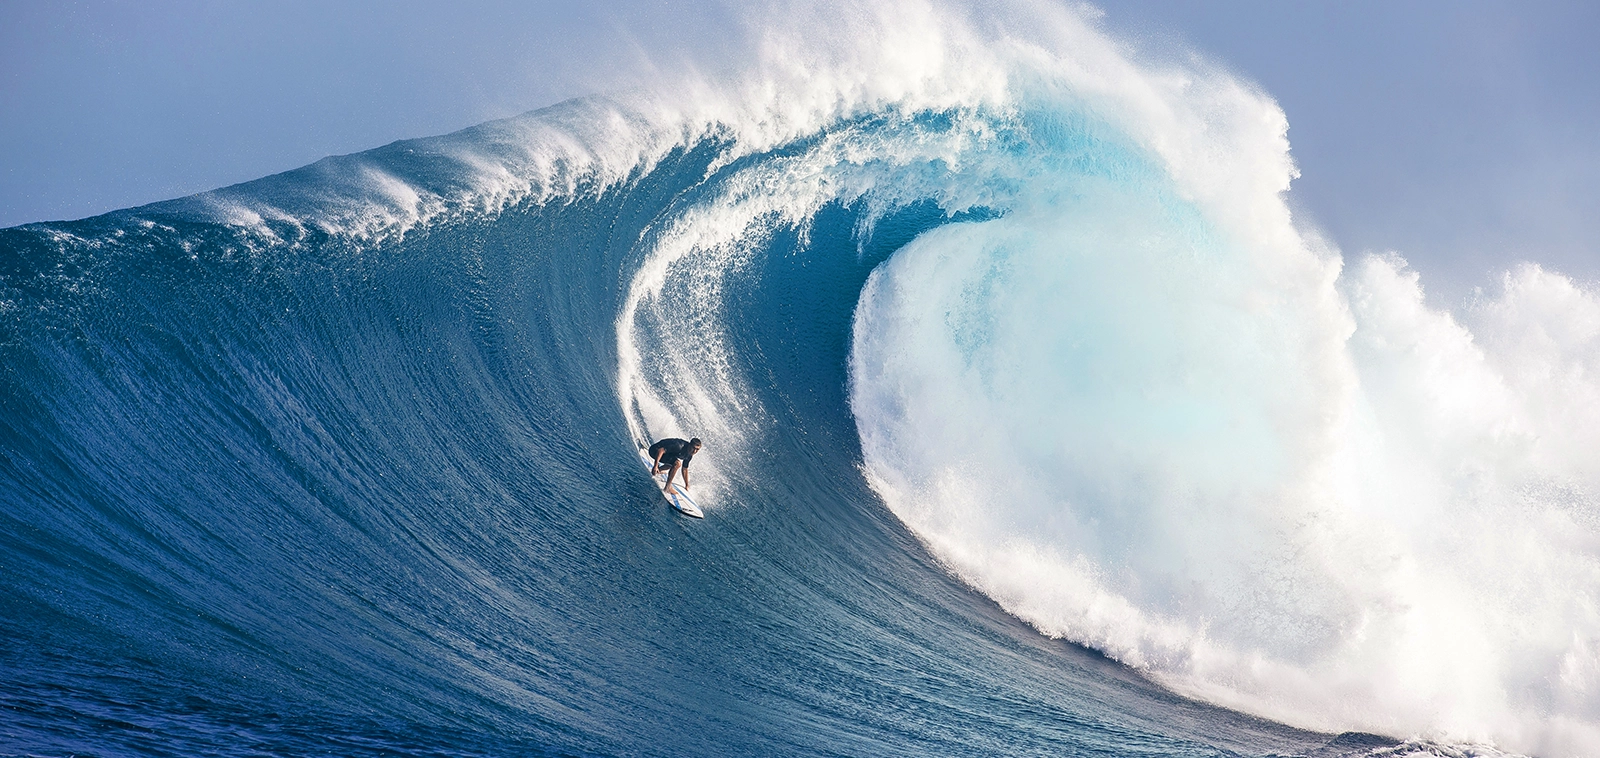
Significant wave height represents the average of the highest third of waves over a given period. This statistical measure offers a realistic view of the general wave size. Meanwhile, maximum height indicates the size of the biggest waves expected, generally 1.5 to 2 times greater than the significant height. This distinction is crucial for assessing real conditions. A swell forecast at 1.5 metres (approx. 5ft) significant height can generate sets of 2.5 metres (over 8ft), considerably changing how you approach the session.
The influence of the seabed on perceived size
The transformation of swell into surfable waves depends closely on bathymetry (the shape of the seabed). Shallow bottoms amplify and slow down the swell, creating higher, steeper waves. Conversely, deep zones conserve the swell’s energy without notable modification. This interaction explains why the same swell can produce waves of very different sizes depending on the spot. A shallow reef break will transform a 1-metre swell into 1.5-metre waves, while a deep-water beach break will keep the size roughly the same.
The vital link between size and swell period
Small swell / long period: perfect waves
A modest swell size associated with a long period can generate exceptional waves. This combination produces powerful, organised, and regular lines (“corduroy lines”), ideal for surfing. The energy concentrated in each wave more than makes up for the reduced height. These conditions favour long rides and technical manoeuvres. Experienced surfers particularly look for these windows where quality trumps quantity.
Big swell / short period: disorganised swell
Conversely, a large swell accompanied by a short period often generates chaotic conditions. The energy, spread over many closely packed undulations, produces irregular waves that are difficult to surf. This configuration, typical of local storms, creates “wind sea” conditions that are less conducive to good surfing. Brute force does not compensate for the lack of organisation, making the session frustrating even for advanced surfers.
The impact of swell direction on your spot
Swell orientation determines which spots will receive the wave energy and at what angle. This geographical variable directly influences wave quality and shape.
How spots “catch” the swell
Each spot has a privileged exposure window, determined by the coastline’s geography. Headlands, bays, and coastal orientation naturally filter swells according to their origin. A spot facing due West will perfectly catch West swells but will remain in the shadow of North or South swells. This natural selectivity explains why some breaks remain flat while others are firing just a few miles away.
Identifying the right spot based on direction
Mastering local exposure allows you to optimise your choice of spots. Precise knowledge of the preferred orientations for each break can transform a mediocre swell into a memorable session, simply by selecting the right spot at the right time. This local expertise is acquired gradually through observation and experience. Regular surfers in an area instinctively develop a mental map of optimal exposures.
Interpreting the numbers for an optimal session
Adapting your spot choice to the swell
Exposed spots vs. sheltered spots: when to choose which? Exposed spots efficiently catch significant swells but quickly become unmanageable in rough weather. These breaks are perfect for medium to strong swells in calm conditions. Sheltered spots offer a valuable alternative during heavy swells or strong winds. Naturally protected, they maintain surfable conditions even when exposed spots become blown out or dangerous. This geographical complementarity considerably widens your surfing possibilities.
Anticipating the evolution of surf conditions
An effective surf report anticipates how conditions will evolve over several days. This forward-looking view allows you to schedule sessions for the most favourable times and avoid flat spells. Trend analysis also reveals optimal windows: those magical moments when several parameters align to create exceptional conditions. Identifying these slots transforms your approach to surfing, prioritising quality over quantity.
Choosing your equipment: the ideal board for every swell
Small waves: volume and fun (longboard, fish)
Small swell conditions require high-volume boards to maintain glide. Longboards excel here, offering easy paddling and long rides. Fishes and other short, thick boards (grovelers) are also excellent choices, combining manoeuvrability with float. Adapting your gear turns small sessions into pure fun, whereas an unsuitable board would generate frustration and fatigue.
Big waves: control and performance (shortboard, gun)
Big conditions demand boards that prioritise control and holding a line in the wave face. High-performance shortboards offer the responsiveness needed for radical manoeuvres, while guns provide the stability essential for very large waves. This technical selection becomes crucial for safety and efficiency in powerful conditions. An unsuitable board can turn a dream session into an exhausting battle against the elements.
Safety and skill level: never underestimate the sea
Knowing your limits against the power of the swell
Every surfer has a technical and physical level that determines the conditions they can handle calmly. Exceeding these limits out of pride or negligence exposes you to real dangers and paradoxically hinders progression. A progressive and thoughtful approach builds confidence and technique in a safe environment. This philosophy prioritises long-term evolution over risky, one-off exploits.
The dangers of strong currents and big waves
Large swells generate powerful and unpredictable currents (rips). These moving masses of water can quickly sweep away even strong swimmers and create critical situations. Knowledge of these phenomena and escape techniques constitutes an indispensable safety toolkit. This mental and technical preparation makes the difference in difficult moments.
Beyond the numbers
Developing your ocean sense and autonomy
“Ocean sense” is acquired gradually through regular observation and correlating forecasts with reality. This particular sensitivity allows you to anticipate micro-local changes and detect opportunities that forecast tools might miss. This expertise develops a valuable form of independence, especially during trips or when discovering new spots. It also transforms your relationship with the ocean, enriching every outing with a contemplative and respectful dimension.
Correlating the report with real observation
Validating forecasts on the ground progressively refines your analytical skills. This scientific approach develops a critical eye on the data and reveals local specificities that global models cannot integrate.
Learning to “read” the ocean before jumping in
Checking real conditions before getting in the water – the “surf check” – is a reflex for safety and efficiency. This visual inspection reveals current zones, sets, critical sections, and potential exit routes. This direct reading of the ocean complements and nuances the surf report data. It often reveals crucial details for optimising the session and avoiding dangerous zones.
Experience, your best teacher
No tool can replace experience accumulated in the water. Each session enriches your understanding of the interactions between swell, wind, tide, and topography. This empirical knowledge develops a reliable intuition that guides your future decisions. This patient and respectful approach to learning forges the most accomplished and safe surfers in the lineup.
The best tools for tracking swell
The digital age offers a multitude of tools to track and analyse surf conditions. These platforms democratise access to data once reserved for professionals.
Reliable surf report apps and sites
Mobile apps have revolutionised access to surf forecasts. These tools offer real-time updated data, interactive swell charts, and multi-day forecasts. Their mobile usability makes checking on-site easy and optimises responsiveness to weather changes. The multiplication of these services allows you to cross-reference forecasts and refine your analysis. This comparative approach reveals consensus and divergences between models, guiding your decisions with greater precision.
Webcams: a real-time glimpse
Webcams installed at major spots offer instant visual validation of conditions. These valuable tools allow you to assess the reality of the terrain before travelling and adjust plans accordingly. This technology also develops your eye for visual wave assessment. Regular observation of the footage improves your ability to estimate wave size, power, and quality remotely.
FAQ – your questions on the surf report
How often are surf reports updated?
Most surf reports update every 6 to 12 hours. Conditions can change rapidly, hence the importance of regularly checking forecasts right before your session.
Should I prioritise swell size or period?
Period generally trumps pure size. A modest swell with a long period often generates better waves than a large, disorganised swell with a short period.
How do I assess if conditions match my level?
Cross-reference the forecast size with your personal experience at the spot. If in doubt, prioritise caution and opt for conditions slightly below your usual capabilities.
What is the difference between swell height and wave height?
Swell height is measured offshore, before interacting with the seabed. Wave height corresponds to the actual size of the breaking waves on the spot, which generally differs depending on local bathymetry.
Can I rely solely on forecasts to choose my spot?
No, forecasts provide a baseline for analysis that must always be checked against real-world observation. Local conditions can differ significantly from general models.